
Though many parts do not require deburring after being cut, there are a few operations that naturally leave something behind at the edge. Lasers leave a thin bead of dross along the underside of the cut. Turret punches push a raised lip out the exit side of every hole. Machined features leave small curls where the tool broke through. The deburring process removes that material before a part moves on to forming, finishing, or assembly.
Several deburring methods produce different results. The right one depends on the edge condition your print calls for, the part shape, the material, and how many pieces are in the run.
This post explains what deburring is and why edge conditions matter, walks through the edge conditions a deburring callout can produce, compares four common ways to deburr sheet metal parts, and covers how to specify and verify the result on an engineering print.
What Is Deburring & Why Do Edge Conditions Matter?

Deburring is the removal of burrs, the raised or ragged material left on a part wherever a cutting, punching, or machining operation ends. A deburred edge is when that excess material is gone, and the edge meets whatever condition the drawing specifies, whether that’s a simple broken edge or a defined radius.
Burrs come in a wide range of sizes. Some are easy to see and feel, while others only show up under magnification and attach to the part with very little material. The deburring operation can also create burrs of its own, called secondary burrs, when an abrasive pushes material over an edge instead of cutting it away cleanly. A well-controlled process accounts for both.
Edge condition matters because so much of what happens to a part later depends on it. A burr can hold two mating surfaces apart and cause assembly issues. Paint and powder coat tend to pull back from a sharp edge as they cure, leaving a thin spot where corrosion can start. Edges that sit near wire harnesses, hoses, or gaskets can wear through them over time, and loose material can work free inside a finished assembly. On parts that see repeated vibration, a sharp edge or corner concentrates stress and becomes the likeliest place for a fatigue crack to begin.
Burr size is also decided well before a part reaches a deburring machine. A worn punch and die produce a heavier burr than a sharp set on the same material, which is why we maintain punch and die condition in-house with a wet punch and die grinder for our turret punching line. Our engineering team reviews hole sizes, spacing, and alignment during design for manufacturing for the same reason, since poorly placed features can produce excessive burrs from punching.
Four Edge Conditions A Deburring Callout Can Produce
A drawing note that says “deburr” can describe several different finished edges. Four are common in sheet metal work, and process time and cost climb as you move down the list.
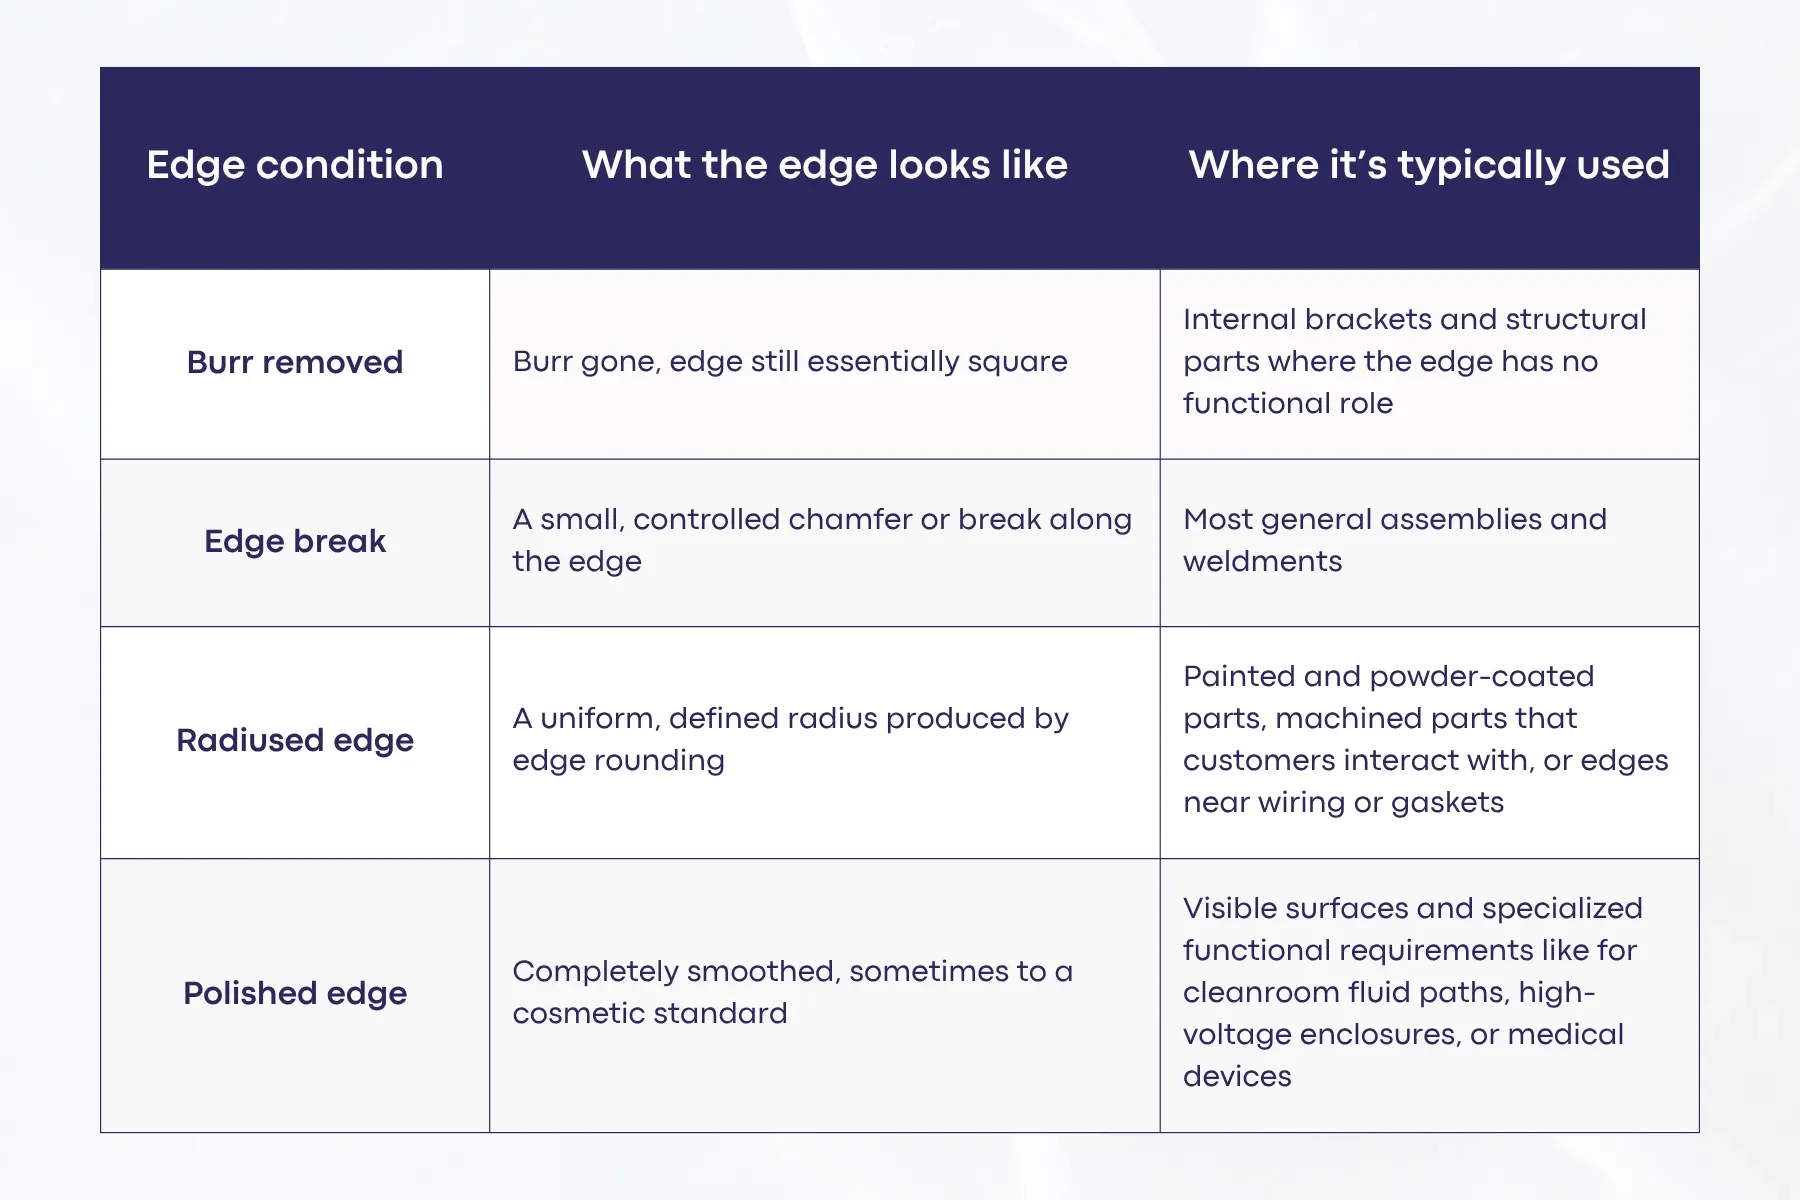
Sheet metal edge rounding moves a part from the second row to the third. It goes beyond burr removal and reshapes the edge into a consistent radius, giving coatings an even surface to build on and softening the sharp transition where stress tends to collect.
When a print says only “deburr all edges,” most shops will deliver something in the first or second row, because that’s the most economical reading of the note. For many parts, that’s the right result. When a particular edge needs more, the drawing has to say so.
Which Deburring Method Do You Need? Matching Solutions to Part Geometry
Every deburring method reaches some areas of a part well and others poorly or not at all, so the shape of the part usually narrows the choice before anything else does. The target edge condition, material, and production quantity finalize the decision. These are the four methods we run on our floor, along with the tools each one relies on.
1. Wide Belt Deburring
Wide belt machines carry the part on a conveyor under an abrasive belt or brush head. They're fast and repeatable on flat parts, cleaning up laser-cut and punched perimeters and leaving a consistent directional finish across the surface. The limitation is reach. The abrasive belt works on flat parts, formed flanges, or hardware standing above the sheet block access. Our Timesaver wide-belt machines run with wet collection systems that capture the fine material the process generates.
2. Oscillating Disc and Brush Deburring
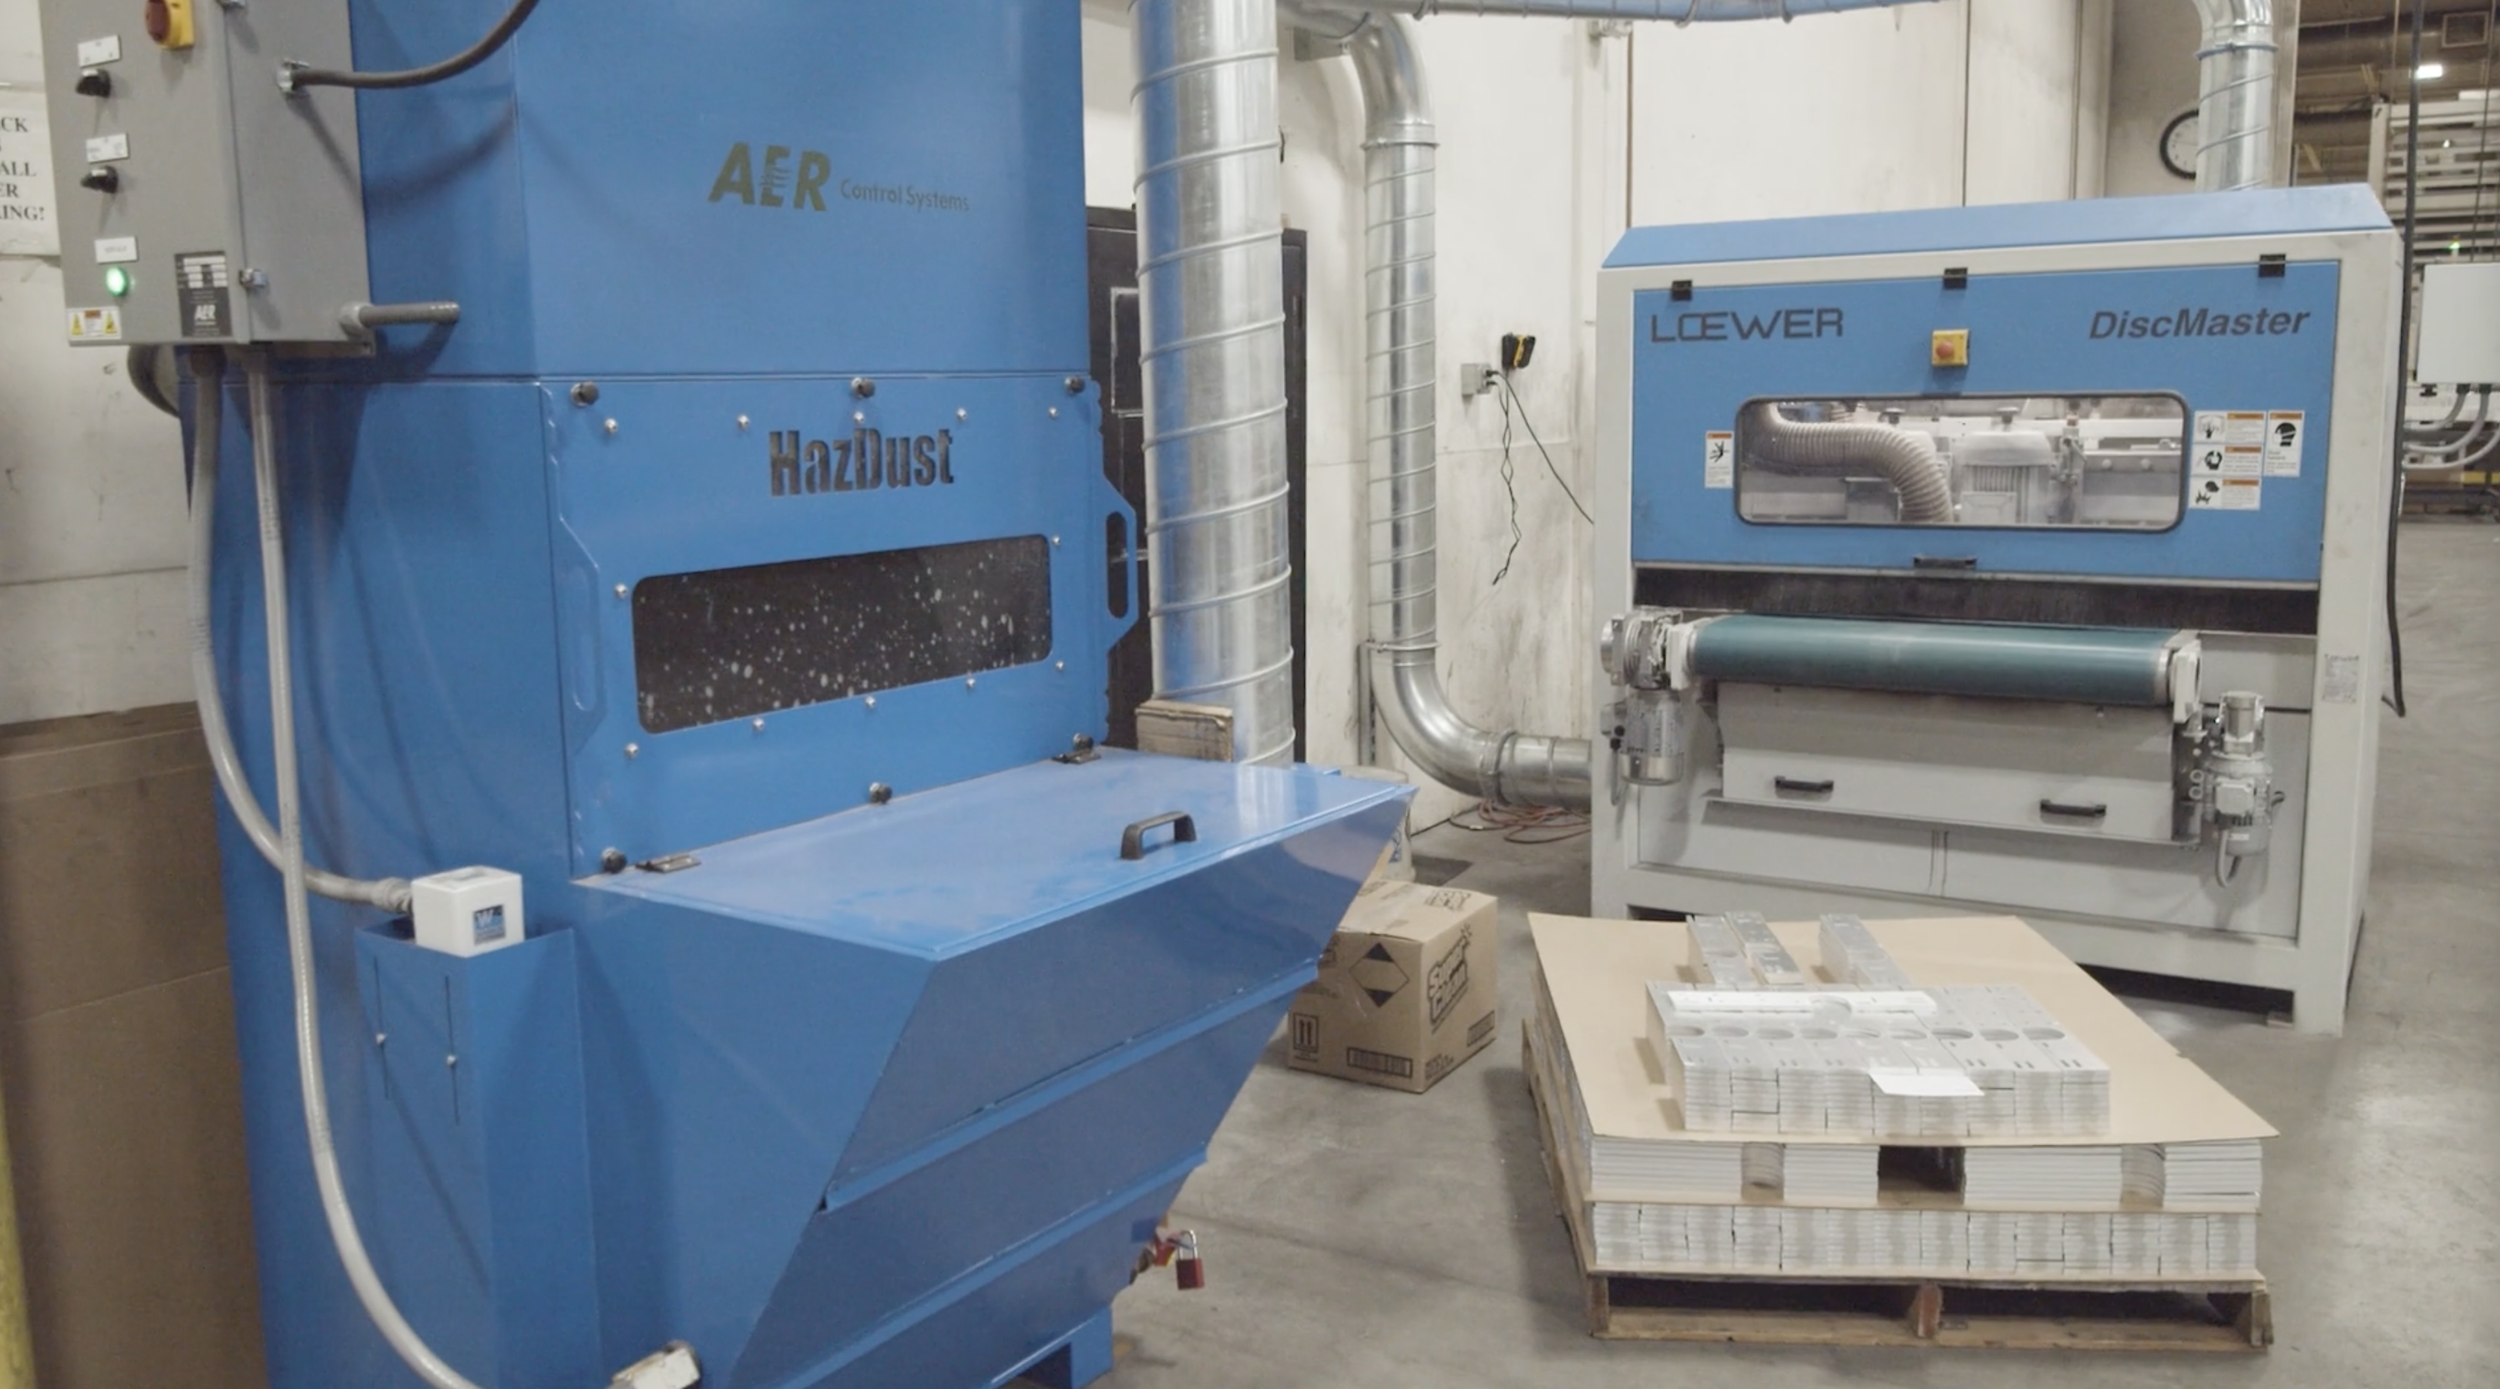
Rotating abrasive discs and brushes work into areas a wide, abrasive belt passes over. Our Loewer DiscMaster 4TD-1000 carries two deburring discs and two edge-rounding discs that oscillate continuously as the part moves through, so the abrasive reaches interior cutouts, hole edges, and the outer perimeter. That makes it one of our main tools for sheet metal edge rounding. It handles laser-cut and 3D punched parts in steel, stainless steel, and aluminum, and it can process zinc-plated material.
3. Vibratory Deburring
Vibratory deburring is a form of mass finishing. Parts go into a tub or bowl with abrasive media, and the motion works every exposed surface at once. The ceramic or plastic media is selected by shape and size so it can get into the part's features without lodging in them. With no fixed head involved, orientation doesn't matter, making vibratory finishing a strong choice for batches of small parts and parts that need a uniform edge everywhere. Cycle times run longer than belt or disc work, and parts need to be small and sturdy enough to tumble. We run three vibratory deburring machines for work containing different deburring media.
4. Hand Deburring
Some edges can only be reached at a bench. We finish features inside formed parts, edges within weldments, tight internal corners, and any area a machine can't present to its abrasive by hand with files, deburring blades, countersinks, rotary burrs, and handheld abrasives and grinders. Hand work is also the practical choice for prototypes and very small quantities, where machine setup doesn't pay for itself. Our secondary operations area is equipped with hand grinding and vibratory tools for this work.
Choosing Between Them
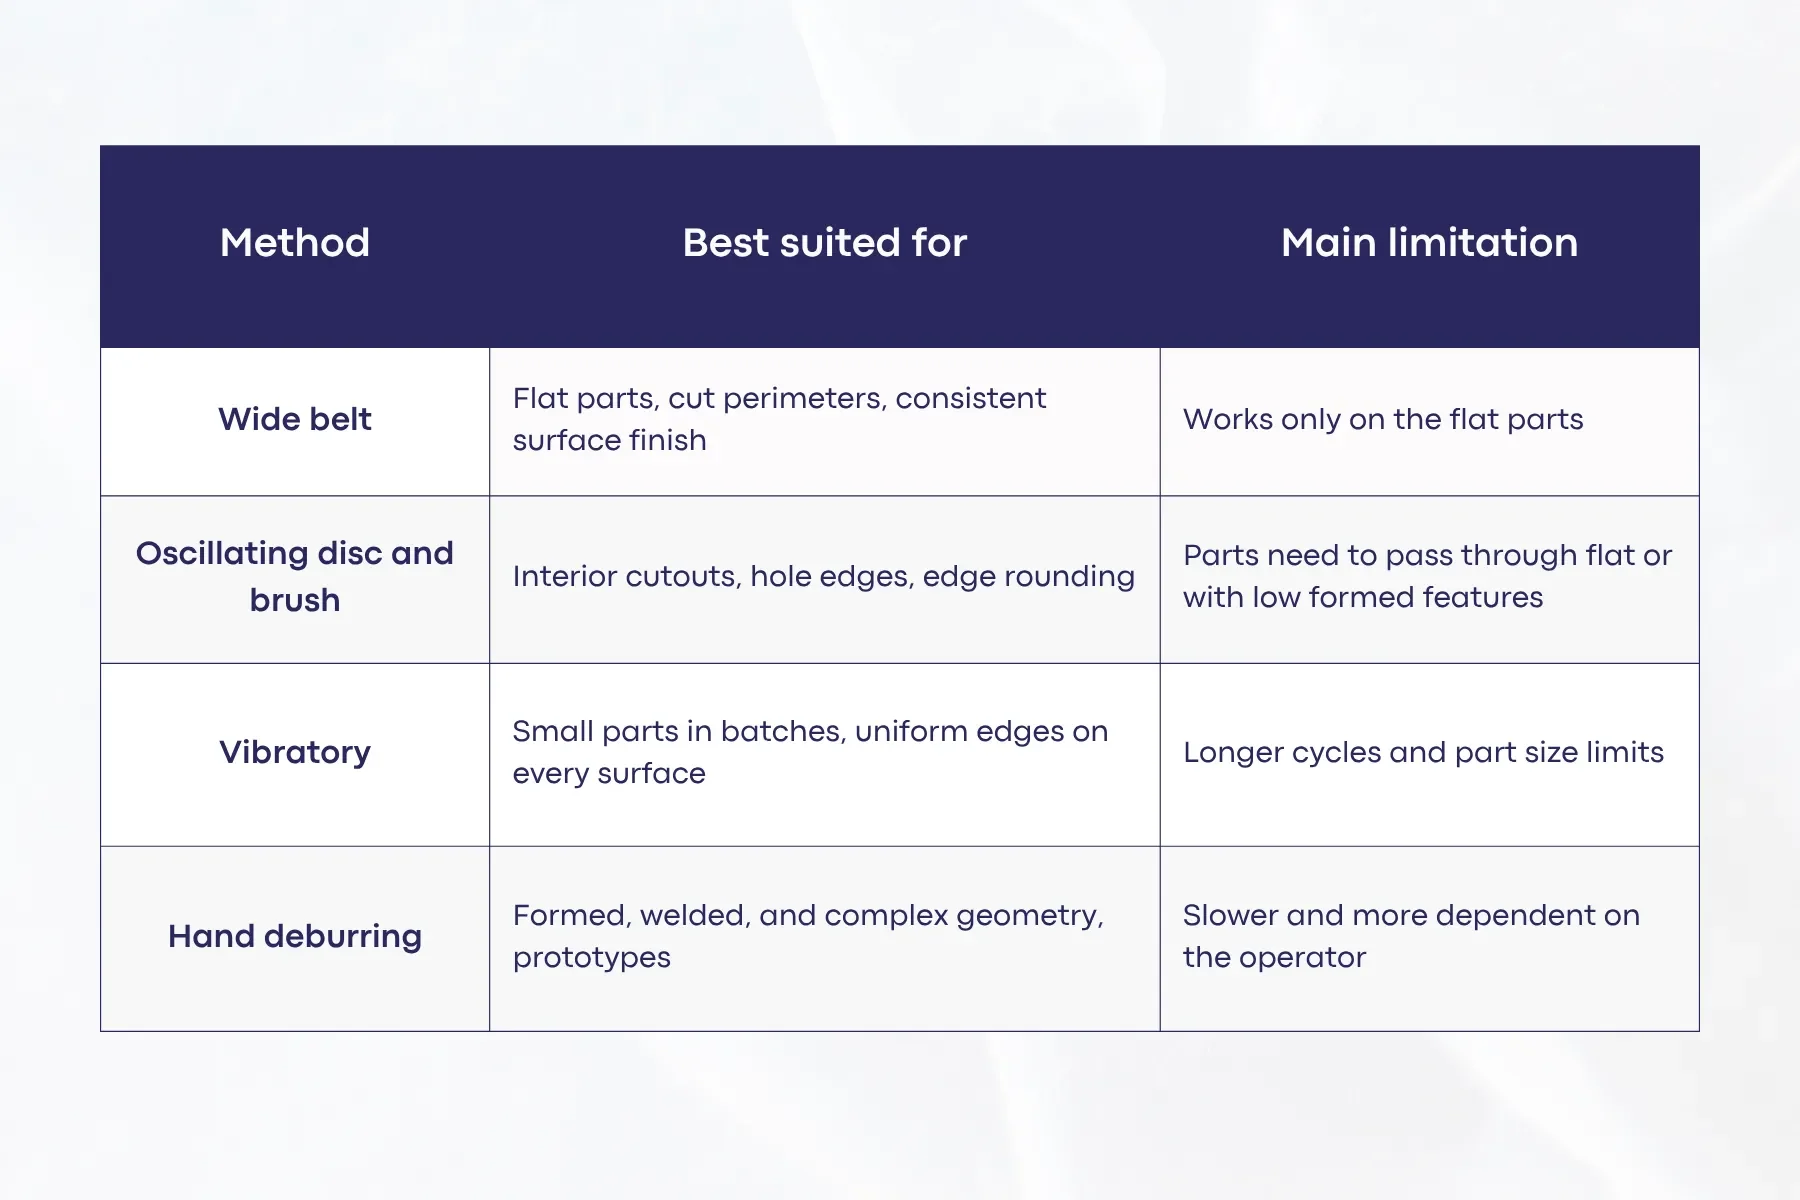
Many parts use more than one. A formed enclosure panel might run through a wide belt or disc machine while it's still flat, then get a hand finish on edges created later during forming or welding. Planning that sequence is part of how we route every job.
How to Specify & Verify Deburring on Engineering Prints
Most mismatches between the edge a customer wanted and the edge that arrived trace back to how the drawing described it. To ensure your contract fabricator supplies the edge condition you need, avoid ambiguous drawing callouts like "deburr all edges."
When a Print Calls for Chemical Etching or Passivation
Some drawings pair the edge requirement with a chemical process:
Chemical etching, sometimes called chemical deburring, removes material through controlled chemical action with no abrasive contact. Fine burrs have a lot of exposed surface for their size, so they dissolve faster than the rest of the part, and the chemistry reaches internal features no tool can touch. Because the process removes a small amount of material from every exposed surface, dimensional allowances must account for it.
Passivation is a chemical treatment for stainless steel, typically performed to a specification such as ASTM A967 or ASTM A380. It removes free iron and other surface contamination so the steel's protective chromium oxide layer forms evenly, which improves corrosion resistance. Passivation doesn't remove burrs, so mechanical deburring needs to be complete before the part goes into the bath.
If your print calls for either process, flag it at the quote stage so the sequence gets planned into the routing from the start.
Verifying the Edge
An edge requirement becomes verifiable once it's written as an acceptance criterion that includes the required condition, inspection method, magnification (if applicable), and sample size.
Our engineering team reviews edge callouts during estimating and flags anything missing or contradictory before pricing the job. Our inspection department, equipped with a Zeiss Contura CMM, a Starrett Galileo vision measurement system, and a Virtek LaserQC scanner, documents results from first article inspection through production. All of it runs under an ISO 9001:2015 quality system that has completed more than 26 BSI audits with zero major non-conformances. You can read more about it on our quality assurance page.
Getting The Right Edge On Your Next Program
Choosing a deburring method comes down to three questions:
What edge condition does each feature actually need?
Which method can reach it?
How will the result be checked?
Answer those on the print, and the rest of the deburring process follows from there.
If you have a part where edge condition matters, send it our way. Request a quote, and our engineering team will review the edge callouts along with the rest of the print, or take a closer look at our metal deburring services to see the equipment on our floor.
